| Table of Contents |
|---|
h1 Introduction
In this window, you can change elements of individual tracks. Changes take effect immediately if Auto Refresh is selected or when the Refresh button is clicked. Many of the style elements can be adjusted from the new Annotation tab or the Data Access panel. For more about changing the appearance of tracks, read Customizing Annotation Tracks
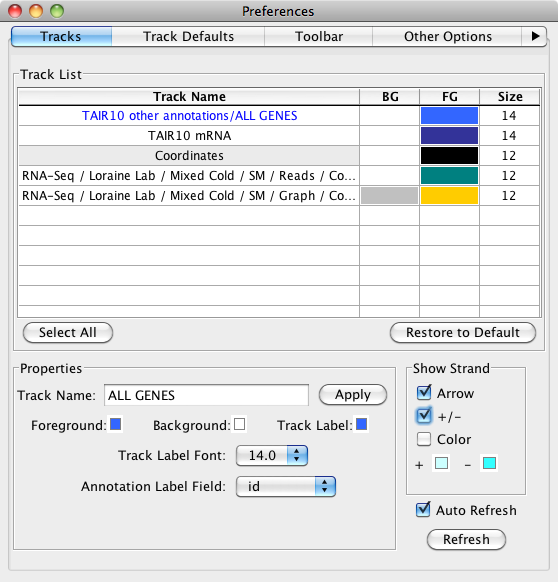
Track List
The Tracks tab has a list showing all loaded tracks (all tracks listed in the Data Access > Data Management table). You can select a track by clicking on it in this list. This table allows you to select any number of tracks, so that you can apply changes to one, all or a subset; simply use command/control click to make multiple selections or use the Select All button. You can change colors or font size in the Track List table by clicking on the item.
Properties
Track Name can be changed by typing in the entry box. This can also be changed from the Data Access > Data Management Table.
...
The Annotation Label Field box allows you to have a specific label displayed over your annotations. The default option is gene name, however you can use any property available within the file including, name, ID, gene descriptions or score. The Annotation Label Field box dynamically adjusts to offer you all options for a selected track. You can turn off the labels by setting Label Field to *none*.
Show Strand
IGB allows you to control the strand display. Checking Arrow will show directional arrow heads within introns, and will put a pointed end onto the last exon of each gene model. +/- allows the user to combine both plus and minus strands into a single track, as opposed to the default which draws the + strand above the coordinate axis, and the - strand below the axis. Checking Color will change the color of all annotations from the Foreground color to the + color or the - color. The colors can be used as default or changed to your preference by clicking on the color box(es). You can all options at the same time, and these options can be used whether or not the strands are combined.
Restore to Default
Sometimes after changing the appearance of a track in a variety of ways, colors and font sizes, etc., you want to return it to the original settings. Restore to Default will restore the track to the Preferences > Track Default settings.
...